How to use the BD LSR Fortessa X20
Jump to:
Start the X20
How to change sheath fluid and waste tanks
Setting up an experiment (tubes)
Setting up an experiment (HTS)
Start the X20
To start X20 switch on the green button on the right hand side of the X20. If it is already on, make sure that it is on ‘Standby’ and ‘Low’.

Start the computer
User: Operator
Password: facs (for Bluebell)
BDIS#1 (for Daisy)
Check if you need to change the sheath and/or waste

How to change sheath fluid and waste tanks
Waste tank
Check if the waste tank is full. If so, empty it according to the following procedure:
Pull off the 3 lines from the top of the white cap. Keep the cap on the bottle (to avoid splashes) and move it carefully, wearing gloves and lab coat, to the sink. Empty the tank carefully. Fill the tank with approximately 100mL of FACSClean. Return the tank to the fluidics cart and put the tubings back in place. Restart the system by pressing ‘Restart’ on fluidics cart.

Sheath fluid tank
Check if the sheath fluid tank is empty or not enough for your experiment. If so, replace it with a new one. Unscrew the lid (which is connected with the probe) and place it into the holder located in the left side of the fluidics cart. Remove the empty tank and keep the black plastic holder. Bring a new Sheath fluid tank (BD FACS Sheath Solution with Surfactant) and put it to its place. Put the black plastic holder and the lid back. Restart the system by pressing ‘Restart’ on fluidics cart.

Setting up an experiment (tubes)
Set up the experiment in FACSDiva software
Open BD FACSDiva software
Log on to your PI user account

Wait for the computer to connect to the X20. Check the status in the lower right corner. The yellow ‘connecting‘ should change to green ‘connected’ within 3 minutes. If not, see ‘Troubleshooting’.

Create an experiment in the browser window

(you can create your own folder within your PI account, please don’t make multiple folders for each day in your name folder)
- If you want to rename it right click and choose rename
Highlight ‘Cytometer settings’ in the browser window

In the inspector window you will see all available parameters
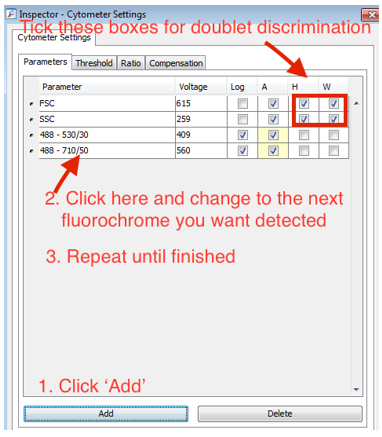
Select fluorescence parameters in your panel. A simple way to do this:
- Highlight the first fluorescence detector, press shift and click on the last fluorescence detector
- Click delete in the bottom of the inspector window
- Click add - Choose a detector for a fluorochrome in your panel (named laser – bandpass filter) by clicking on the detector name and scroll to find the detector of your choice
- Repeat the last step for all required fluorochromes in your panel

- The overview of lasers and filters stuck on the X20 might be helpful, you can also find a pdf version on our web page under X20.
Tick H (height) and W (width) for both forward scatter (FSC) and side scatter (SSC) to ensure a good doublet discrimination
If you are interested in the cell cycle remember to untick log scale for your DNA dye and tick H and W instead
If you want to run compensation in the DIVA software do it now
Create a workspace
Create a specimen (syringe) in the browser window

- Open the specimen by clicking on the ‘+’ sign

- Activate the tube (Remember the arrow on the left hand side needs to be green, you cannot only highlight the tube)

Create your workspace in the workspace window
- Click once on a plot (dot, contour or histogram) to create one plot of the selected type by clicking the desired location of the plot and dragging the mouse away until the plot has the shape you want

- Double click on a plot type, if you like to create multiple plots of the same type. To stop, click on the arrow symbol in the headliner
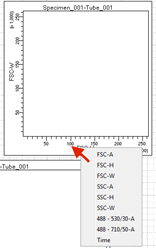
- To change the parameter on the axis – click on the axis you want to change and find the parameter you want
- You can create gates in the workspace window (easiest when running a sample, but explained now). The gates are mainly useful to ensure you will record enough of the cells of interest.
Choose a gate in the headliner of the workspace window (the polygon or rectangular are often the most useful)
Draw on the plot you wish e.g. the FSC-A SSC-A

- To continue with these cells in the gating strategy you can do it in several ways, we describe one here:
Right-click on the next plot in your gating strategy chose ‘Show population’ and select the gate you just created
Now repeat the previous steps from create gates until you have your entire gating strategy
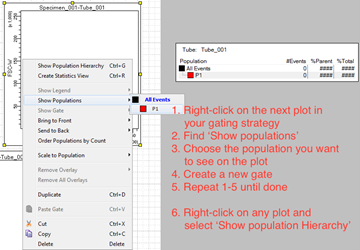
- When you have finished creating gates, right-click on any plot and choose ‘Show population hierarchy’ this will give you a list of all gates created and show the hierarchy
If you want to rename your gates, click once wait a second click once more, you should now be able to change the name of the gate. Alternatively click once on the gate in gate hierarchy list, go to inspector window and rename the gate
- Check if your gates have the right hierarchy especially if you need to record a specific number of a rare cell type. (if you need to change hierarchy of your gates you can do so by right-clicking on the selected gate and using cut/paste options)
Running a sample
Prime the cytometer
- Remove the tube of water by opening the arm and pulling down the tube
- Place the tube in a rack
- Press ‘prime’ on the cytometer

- Wait until the cytometer again shows standby

- Repeat the ‘prime’
Check the fine adjustment settings (Screw on the left hand side of the control panel at the X20)
- The screw has 10 turns in total
- We recommend to start in the middle: Go to either extreme and turn it 5 rounds in the other direction

Press ‘Run’ on the cytometer
The button will be yellow/orange when the arm is open or the sample tube isn’t pressurised correctly

Load a sample on the cytometer and close the arm
Check if the ‘Run’ button changes to green

If not, unload the sample and look for cracks in the tube
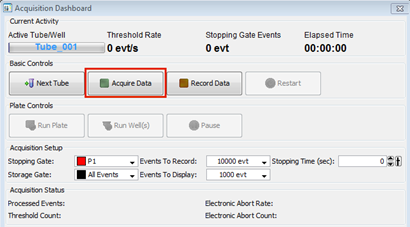
Find the window Acquisition dashboard in the DIVA software
Press ‘Acquire’ to see your sample in the workspace window
Adjusting the parameters
When the first sample is running (typically the negative control) you have to adjust the detectors sensitivity – PMT voltages
Go to the cytometer window and find the tab ‘Parameters’
You have a list of all your chosen parameters (FSC, SSC and detectors for your fluorochromes of interest)
You now have to adjust the parameters in the cytometer window while you are looking at the different plots in your workplace
Choose a parameter to adjust
- Look at it in the workspace, if the population is high on the axis you want to lower the voltage and vice versa for low populations
- Adjust the voltage of the parameter in the cytometer window either by typing a number or scrolling on the slide or using the small arrowheads

After each adjustment press ‘Restart’ in the Acquisition dashboard

Look again at the parameter in the work space and repeat these steps until you are satisfied
We suggest adjusting FSC and SSC first to find your cells and centre them in a FSCxSSC dot plot
If you struggle to see your cells, first check whether they are not ‘above’ the edge of the scale (either on FSC and/or SSC). Reduce SSC voltage to 150mV (detected events appear very low on SSC) and play with FSC values (test in increments of 100mV). You should be able to see your homogenous population of cells – fine tune FSC and SSC voltage so they are spread around the centre of the scale (in linear mode)
In general, the best settings for fluorochromes are PMT between 300-700 mV if possible
For the negative sample a general rule is the cells should be located approximately around 102 on all fluorophores but PMT values mentioned above is more important

Compensation
To create compensation control tubes:
Select Experiment > Compensation Setup > Create Compensation Controls. The ‘Create Compensation Controls’ dialog opens.

Click OK.

Expand the Compensation Controls specimen to see the Compensation control tubes that are added to the experiment. Worksheets containing appropriate plots and gates are added for each compensation tube.

Install the unstained control tube onto the SIP.
Set the current tube pointer to the unstained control tube (it becomes green), then click Acquire Data in the Acquisition Dashboard.
Verify that the population of interest is displayed appropriately on the FSC vs SSC plot and adjust voltages if necessary.
Adjust the P1 gate to surround only the singlets.

Right-click the P1 gate and select Apply to All Compensation Controls.
Click Record Data.
When recording is finished, remove the unstained control tube from the cytometer.
Click Next Tube.
Install the next tube onto the cytometer and record.
Double-click the first stained control tube to display the corresponding worksheet.
Verify that the snap-to interval gate encompasses the positive population.

Repeat the procedure for all compensation controls
Important note: Do not change the PMT voltages after the first compensation control has been recorded. In order to calculate compensation, all controls must be recorded with the same PMT voltage settings. If you need to adjust the PMT voltage for a subsequent compensation control, you must record all compensation controls again
To calculate compensation:
Select Experiment > Compensation Setup > Calculate Compensation.

Enter a setup name and click Link & Save.
Note: We recommend that you always visually and statistically inspect automatically calculated spectral overlap values. The means of the positive controls should be aligned with the means of the negative controls.
Recording a sample
Adjust the gates in the workspace if needed/ record a small sample file before adjusting the gates
Find the Acquisition dashboard
Decide if you want to change the stopping gate from ‘All events’ to one of the gates in your gating hierarchy
Decide the number you want to record in your stopping gate
Keep the storage gate at ‘All events’ this way you will not loose any of your cells even if the gates are not optimal
Press ‘Record’

Make sure to check the volume of your sample
If it is close to running dry press ‘Stop recording’ to save whatever you already have recorded before air enters the system

If you have sufficient amount of sample your recording will stop automatically when the stopping gate is reached
Unload the tube you just have recorded from the cytometer

If you have more tubes to record press ‘Next tube’ in the acquisition dashboard
Rename the tube

Load the new tube and press ‘Acquire’
Press ‘Record’ once you have seen your cells in the workspace – wait at least 5 seconds from you load the sample to you press record
Continue until all samples are recorded
Export your experiment
Highlight the open experiment in the Browser window
Right click on the experiment
Find ‘Export’

Click on FCS files
Choose 3.0 for all types of sorts or 3.1 if you have index sort
Leave all other settings

Choose where to save your files – either to a folder on the desktop or your own memory stick
You can also export ‘Experiment’
Tick export as ZIP file
Choose where to save your files
NOTE: Although ‘Experiment’ also exports FCS files, when they are opened in FlowJo they don’t have the tube names you gave them during acquisition.

Setting up an experiment (HTS)

1. Follow ‘Start up’ as normal and check the sheath and waste tanks (See ‘Start the X20’)
2. Follow the instructions below on how to change from tube mode to plate mode.
How to change from tube mode to plate mode (High Throughput Sampler, HTS)
Check the instrument is on ‘Standby’ and ‘Low’
Move the aspirator arm to the side and unscrew the plastic grey tube retainer which is connected with the Droplet Containment Sleeve. Be careful not to bend the sample line. Put them in a 15mL falcon located on the rack next to the computer - it is used as a storage container.

Take the SIP protector from the storage tube and screw it back in the same place the DCM sleeve was.

Attach the sample coupler to the SIP carefully. Push sample coupler onto the SIP until you feel a stop. Hold the sample coupler in place and tighten the top nut (finger tight only).

Make sure sheath and waste lines are connected to HTS

Switch to plate mode by pressing the button on the right hand side of the instrument.

Turn on the HTS power button located at the back of the unit facing the wall.
Open BD FACSDiva software.
Press ‘Run’ on the panel.

In BD FACSDiva software, select HTS > Prime, 2x to remove air bubbles caught in tubing. (Note: Safety cover must be on for software to execute Prime function).

When priming finishes, press ‘OK’.

Setting up Experimental Plate Editor and Worksheet
Create a new experiment in the browser window and select the parameters used in the experiment (See ‘X20 – Setting up an experiment (tubes)’)
In the browser toolbar select the type of plate in the drop down menu next to the plate icon

A new window with the plate layout will appear.

In the plate layout window, select the wells that have samples by either holding the Shift key to select continuous wells or the Control key to select individual wells. Select the Specimen icon to apply specimen wells. This will assign each selected well with a specimen and applies default settings for acquisition accordingly. You can see the specimens you created on the right hand side panel of the window.

Select ‘Standard’ for Throughout mode.

Modify Loader Settings as required according to your experiment.

Running a plate
Remove safety cover from the HTS unit and place the plate with well A1 aligned with marking on the HTS stage

Put the HTS safety cover back in place carefully.
On the Acquisition Dashboard, Setting Events to Record: click each well separately and select desired events. If you want to record the same number of events from each well, select all of them and select desired events. (Note: In the plate editor window only the green highlighted well is changed when selecting events to record even if multiple wells are selected. If sample is loaded and not collected, it is LOST)
Select specimen well and click ‘Run Wells’ or ‘Run Plate’ on the Acquisition Dashboard

When the plate finishes, you can either proceed to the next plate (if you have any) or move on to the cleaning procedure.

Take a clean plate and fill wells as following:

Remove cover on HTS and place cleaning plate in correct orientation.
Go to HTS tab and select ‘Clean’

Replace cover and click ‘OK’
Once finished daily cleaning procedure, you need to return the instrument to tube mode.
To do this:
- Press ‘Standby’
- Turn off the HTS unit
- Switch back to tube mode by pressing the button on the right hand side of the instrument
- Remove the SIT protector and put the DCM sleeve back.
Daily cleaning procedure
Unload your last sample from the X20
Prepare cleaning solution: Put FACS Clean to just over half the tube (Hold two fingers on top of the tube and fill the cleaning solution in the tube until it is on level with your fingers)

Load the tube without closing the arm
Set the speed to ‘High’

Leave the arm open for a minute
Close the arm and run for three minutes
Repeat the cleaning procedure with water

NOTE: If you have a special sample (like sticky cells, yeast etc), please run a tube with FACSRinse (cleaning solution) in between FACSClean and water following the same steps.

Shut down or standby
Check the calpendo calendar and choose either of the two options below depending on the calendar booking:
If someone is coming within 3 hours after your booking finishes and before 5pm

Clean the cytometer as described in ‘Daily cleaning procedure’ sectionSet the speed back to ‘Low’
Leave the tube with water on the cytometer
Press ‘Standby’

In the diva software go to file and click ‘Logout’

2. If no one is coming after you within 3 hours or the next user is coming after 5pm

Clean the cytometer as described in ‘Daily cleaning procedure’ section
Set the speed back to ‘Low’
Leave the tube with water on the cytometer
Press ‘standby’

In the diva software go to file à ‘Quit’

Shut down the computer
Shut down the X20 using the green button on the right hand side

Troubleshooting
No events
Check FSC and SSC voltage. You might need to adjust them in case the events are out of scale.
Run a different sample tube or a tube of beads.
- If you can see events now, check the previous tube for cracks – this could affect the pressure on the system.
- If you cannot see events, the instrument might be clogged. Run a cleaning cycle (See ‘Daily cleaning procedure’)
Check waste and sheath fluid tanks. Empty the waste tank or replace the sheath fluid tank according to the procedure.
Check the grey conical plastic cap is tightened enough. If it is loose, tighten it – not too hard, finger tight is enough.
Low events
Sample is too diluted
Sample is not adequately mixed
Check if there are bubbles into the sheath filter or sheath line. Bleed the filter by rolling the rolling clamp until there are no bubbles.

Check if the reservoir is empty or almost empty - the probe must feel the liquid. If it is empty, press ‘PRIME’ on fluidics cart for 5 seconds or until ‘Pump fill’ lamp turns off. By doing this, sheath fluid travels to and refills the reservoir.

Fluidics cart is alarming
Press ‘Alarm’ on fluidics cart – this will silence the alarming.
Check the sheath fluid tank. If it’s empty, replace it with a new one according to the appropriate procedure.
Check if the sheath tank’s probe is screwed correctly in place.
Check the waste tank. If it’s full, empty it according to the procedure (See ‘Start up – How to change sheath and waste tank’)
Check if the waste tank’s lines are correctly in place.
‘RUN’ button is orange
Check if the sample tube is properly seated. Also check if the arm is correctly in place.
Check if the sample tube is cracked. That would affect the pressurisation. If this is the case, put your sample in another tube.
Check if the waste tubing line is properly connected to the waste cap.
Check if the sheath reservoir is empty
Cytometer and software disconnected
Close Diva and restart the computer
If it doesn’t work, turn the computer off, switch off the cytometer (green button), wait 2 mins and switch it back on. Turn on the computer, open Diva and log in